For about the price of a few takeout dinners, you can build a small box that turns the sky overhead into your own private radar. It plots the planes around you in real time, shows even the military and hidden-tail-number flights the big apps keep off their maps, and is the raw material behind the flight-path prints we make at SkyPath.
- Cost: roughly $140 to $180 for everything, less if you build your own antenna.
- Time: an afternoon.
- Difficulty: the image path needs no terminal commands; the from-scratch path is copy-and-paste commands.
- License: none. Receiving is passive, just listening.
- What you get: a live local map of the aircraft your antenna can hear, and the option to feed the global tracking networks.
There are two ways to build it, and they cost the same: flash a ready-made image and answer a few prompts, or install the software by hand. New to the signal itself? Start with What Is ADS-B, and What Problem Does It Solve?.
| Path A: flash an image | Path B: from scratch | |
|---|---|---|
| Terminal commands | None | Copy-and-paste |
| Setup time | About 20 minutes | An hour or so |
| Cost and hardware | Identical | Identical |
| Customizable | Limited | Everything |
| Best for | First-timers and non-programmers | Tinkerers who want full control |
If you are not a programmer, Path A is the whole project, and you can graduate to the hand-built version later.
What you will see
Boot it up and your map fills with the aircraft overhead: their altitude, speed, and callsign, pulled out of the air by your antenna and nothing else. If you already use an app like Flightradar24, your own receiver differs in two ways. You see your slice of sky directly and in real time, with no server in the middle, so it keeps working even when your internet drops. And it shows everything it can hear, unfiltered, including aircraft the big public apps leave off their maps to honor blocking programs: military and government flights, medevac and police helicopters, and private jets with hidden tail numbers. Anything not transmitting ADS-B at all still will not appear.
A 1090 MHz build like this hears airliners and most higher-altitude traffic. In the United States, some light general aviation flies on a separate 978 MHz link that a basic setup misses, which you can add later with a second dongle. How far you reach depends on your antenna, covered below.
What you need
Every build uses the same four things: a software-defined radio, an antenna, a small computer, and, in noisy locations, a filter. Buy one receiver dongle, not both of the options below.
| Component | Notes | Approx. price |
|---|---|---|
| RTL-SDR Blog dongle (V4 or successor) | Best value; may need a one-time driver step (Path B). Availability shifts, so check stock | ~$45 |
| FlightAware Pro Stick Plus | Driver-free, with a built-in 1090 MHz filter, but frequently out of stock | ~$46 |
| FlightAware 1090 MHz antenna | The single biggest factor in your range | ~$50 |
| 1090 MHz bandpass filter | Only if your dongle is not already filtered | ~$20 |
| N-to-SMA adapter or pigtail | Joins the N-type antenna to the SMA dongle; usually N-male to SMA-male | ~$8 |
| Raspberry Pi (3, 4, or Zero 2 W) | The computer that runs the decoder, around the clock | ~$35 to $75 |
| microSD card, 16 GB or larger | Holds the operating system | ~$10 |
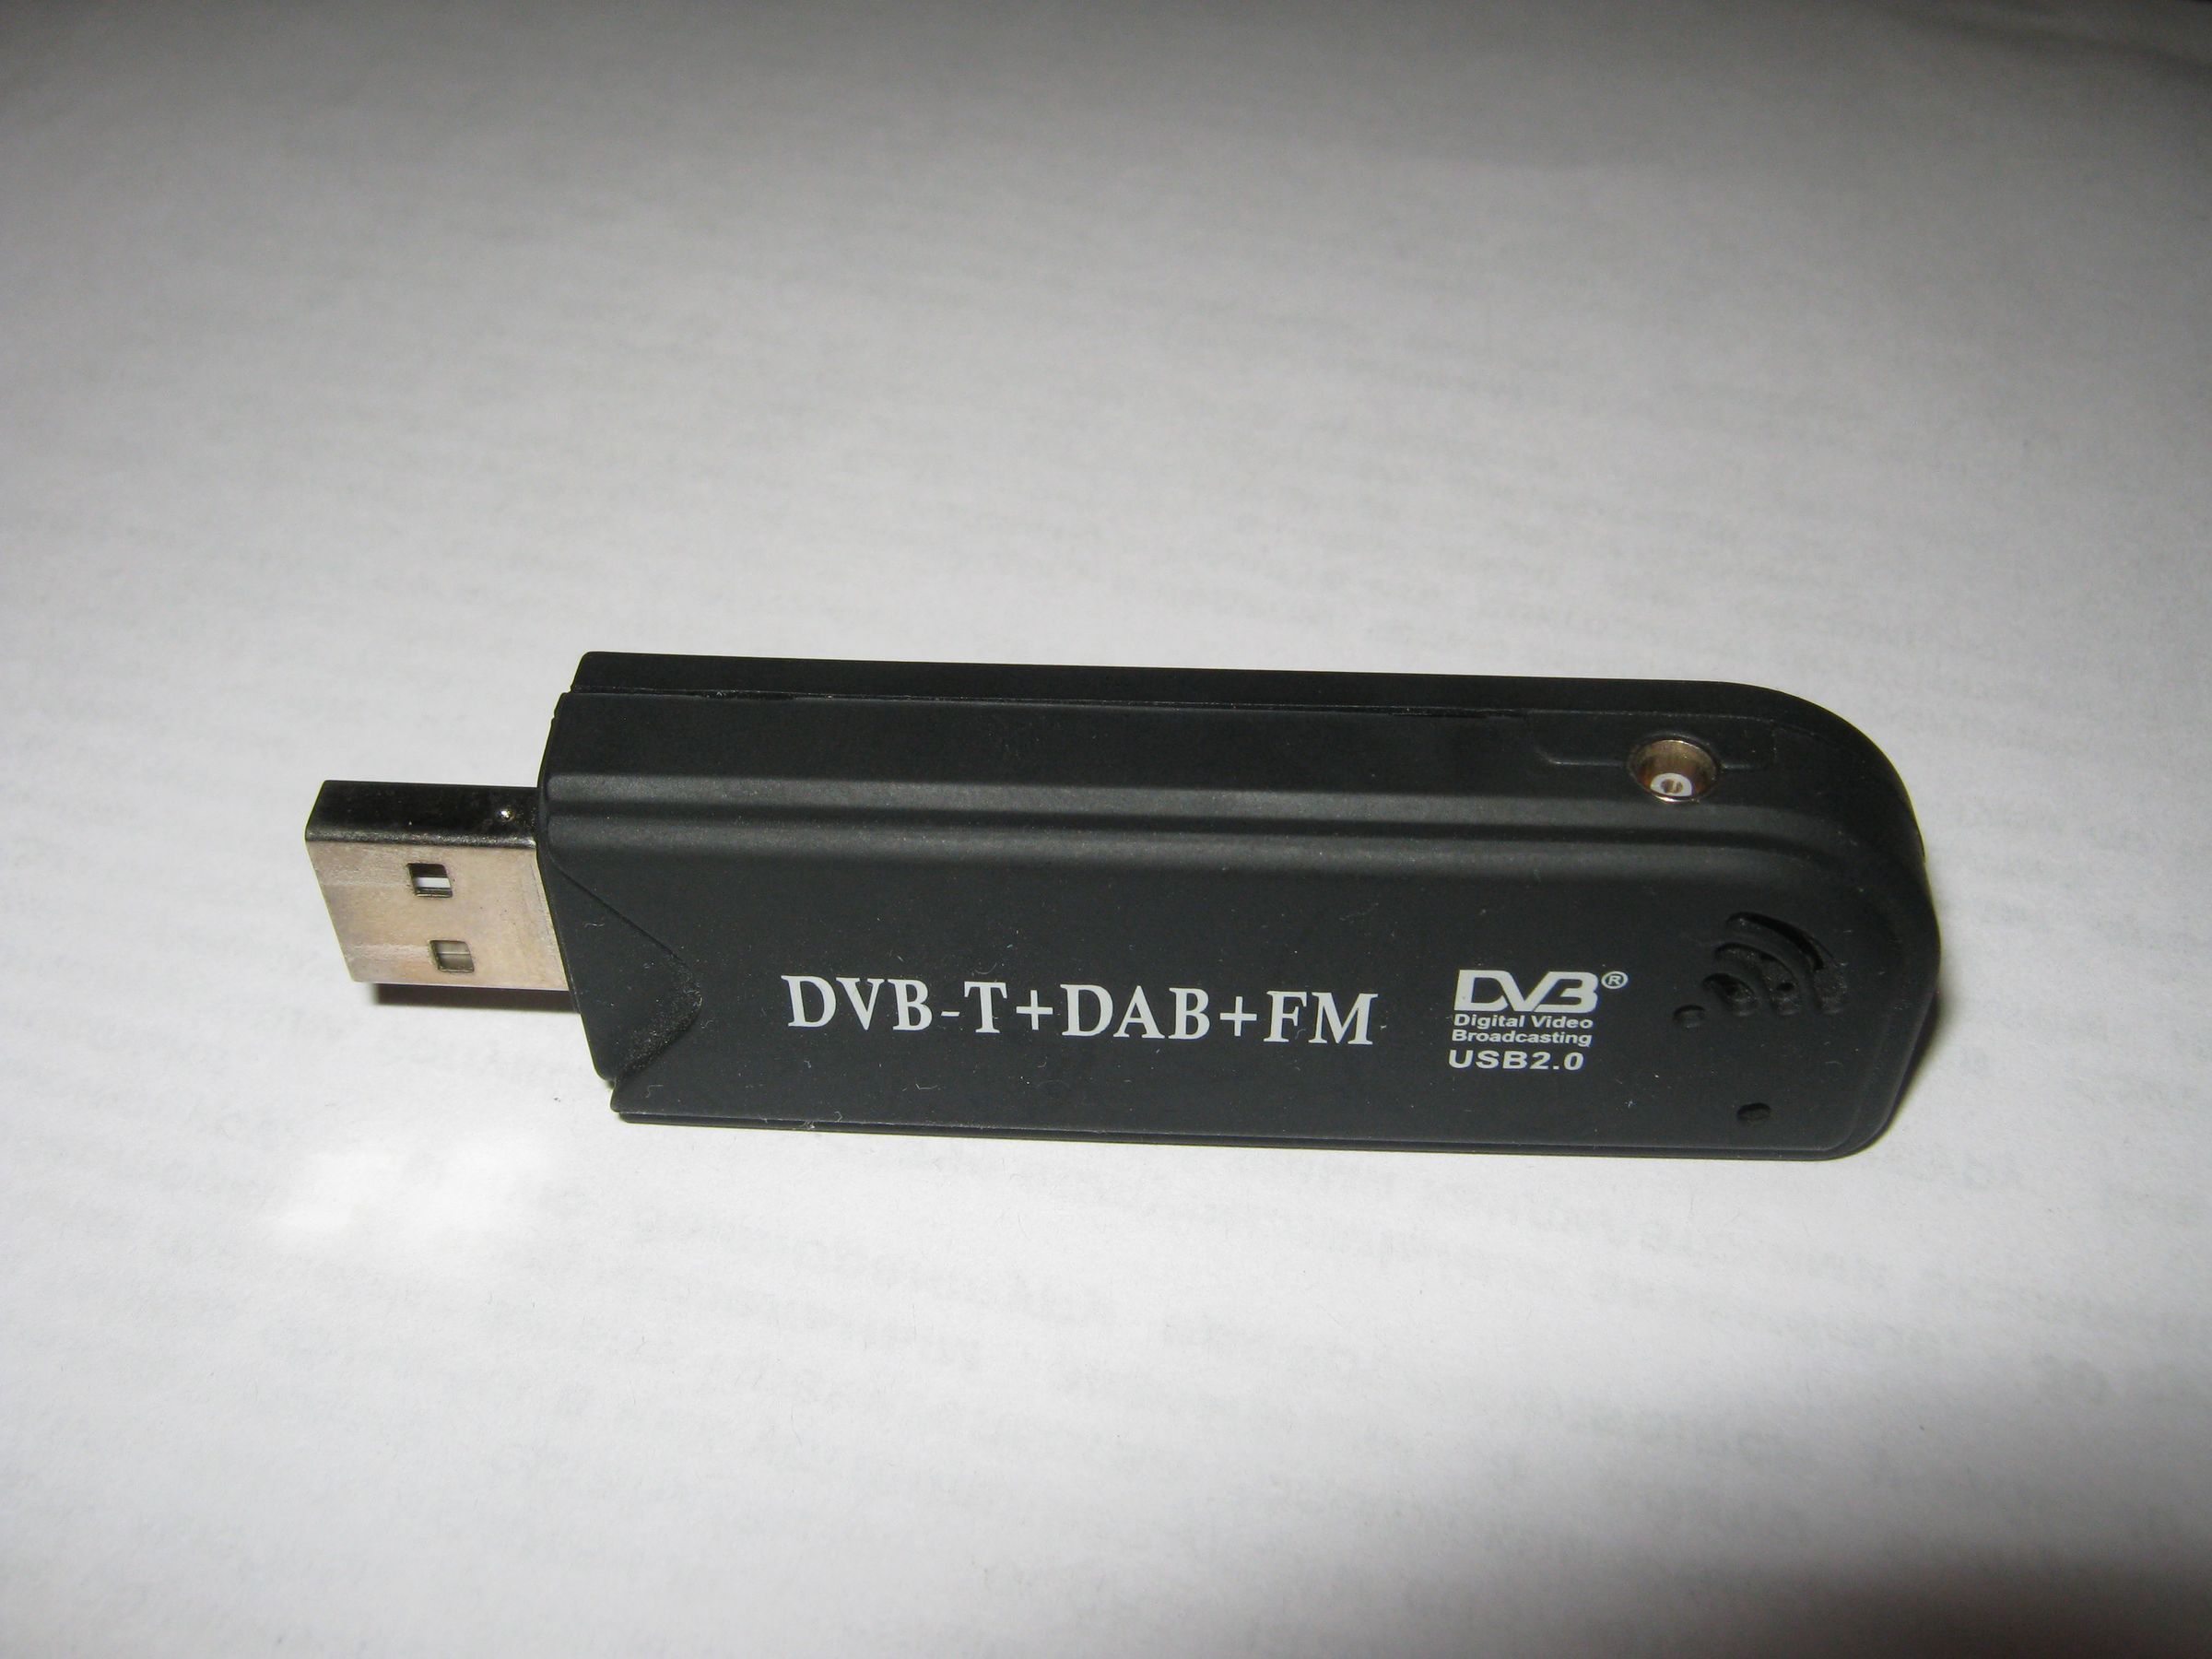
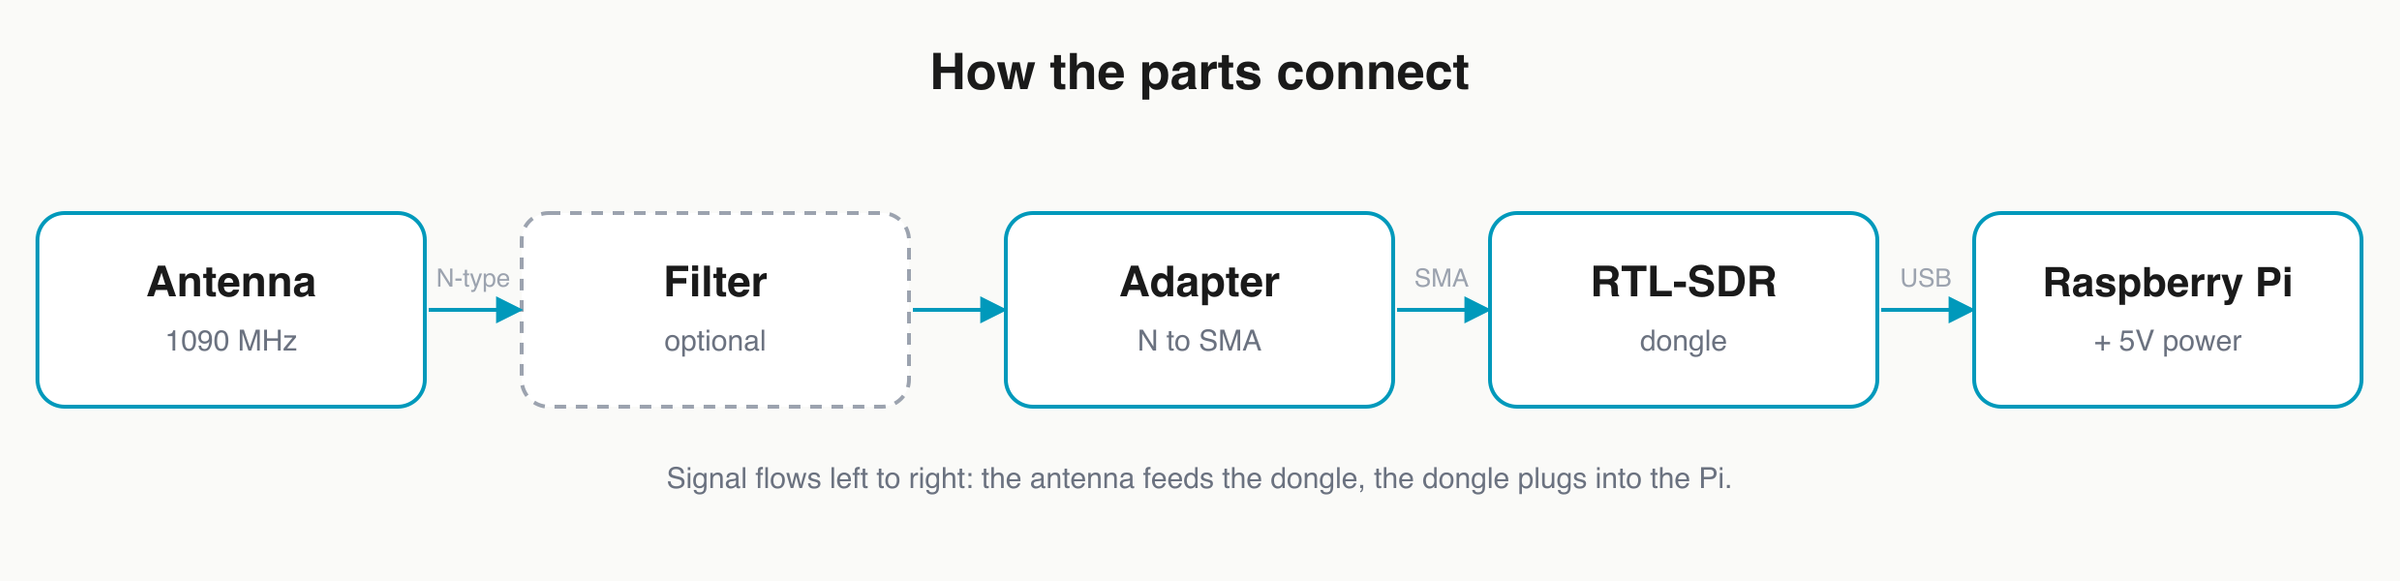
The FlightAware antenna ends in an N-type (female) connector and most dongles, including the RTL-SDR Blog V4, use SMA (female), so you will usually need an N-male-to-SMA-male adapter or pigtail. Confirm what each end needs before you order, since mismatched connectors are a classic "the parts do not fit" moment.
Availability on these dongles shifts, so check current stock before ordering. An RTL-SDR Blog dongle is the best value and usually works straight away; if it does not, installing its driver is a one-time step covered in Path B. The FlightAware Pro Stick Plus is driver-free with a filter built in, which makes it the cleaner match for the no-terminal Path A, but it has often been sold out. If you never want to touch a terminal, that is the one to track down.
Path A: flash a ready-made image
Pick this for the fastest result with no terminal. The quickest route to aircraft on a screen is FlightAware's PiAware image. It arrives with the decoder and a map already installed. You will not type a single terminal command; the only fiddly parts are choosing options in the flashing tool and finding the Pi on your network.
Assemble the hardware
Connect the antenna to the dongle, adding the bandpass filter between the antenna and the dongle if your dongle is not already filtered. Plug the dongle into the Raspberry Pi, and use the official Raspberry Pi power supply (5V/3A for a Pi 4). A spare phone charger often cannot hold the current the Pi and dongle draw, and an underpowered Pi throttles and drops out.
Flash the image to the card
Flashing means writing the operating system onto the microSD card. Download the current PiAware SD-card image from the PiAware build page and write it with Raspberry Pi Imager. Unzip the download first and select the extracted .img file with the "Use custom" option; FlightAware warns that flashing the zip itself leaves a card that will not boot.
Set your WiFi
The card mounts on your computer like a USB stick. Open it like a folder, then right-click the file named piaware-config.txt, choose Open With, and pick a plain text editor (Notepad on Windows, TextEdit on a Mac). Fill in your network. If the SSID or password contains anything other than letters and numbers, wrap the value in quotation marks. Skip this step if you are using wired Ethernet.
wireless-network yes
wireless-ssid MyWifiNetwork
wireless-password s3cr3t99Boot the receiver
Eject the card, put it in the Pi, and power it on. After a minute or two it joins your network and starts decoding. To reach it you need its address: open your router's admin page (usually http://192.168.1.1, which may ask for the password printed on the router) and look in the device list, where it appears named "piaware," or try the name piaware.local directly. If neither shows up yet, wait another minute and refresh; the Pi takes a moment to appear.
Open your map
In a browser on the same network, go to http://piaware.local:8080/, or use the address you found as http://192.168.1.42:8080 (substitute your Pi's actual address, no angle brackets). You should see the aircraft your antenna can currently hear, plotted live.
Claim your receiver (optional)
Sign in to FlightAware and open the claim page to link the receiver to your account. This also sets your location, so the map's range ring works without any command line. Feeders get a free FlightAware Enterprise account and a statistics page in return.
If you chose the RTL-SDR Blog V4 and see no aircraft after several minutes, its driver is almost certainly the cause. The fix is the V4 driver step in Path B. A driver-free dongle like the Pro Stick Plus avoids this entirely.
That is the whole build. Path A leaves you with a running receiver and a live map. The sections below, gain tuning, feeding, and 978 MHz, use the command line and belong to the from-scratch path; you can stop here, or pick them up when you are ready.
Path B: build it from scratch
Pick this to install and customize each piece yourself (copy-and-paste commands). Path A already gave you a working receiver. This path installs the same software by hand, for people who want to understand or customize each piece. It costs the same. Start from a standard Raspberry Pi OS install.
You can set the Pi up without a screen. In Raspberry Pi Imager, open the settings (the gear icon) before flashing and set your WiFi, enable SSH, and choose a hostname like adsb. SSH is how you type commands on the Pi from your own computer: open Terminal (on a Mac) or PowerShell (on Windows) and run ssh pi@adsb.local. (If .local will not connect, which happens on some Windows and Android setups, use the Pi's IP address from your router instead.) Once you are in, update it with sudo apt update && sudo apt full-upgrade.
Confirm the dongle is seen
Before installing anything, check that the system can talk to the dongle:
rtl_testIf it lists your dongle, the driver is fine, skip ahead. If it reports the device is in use or not found, and you are on a V4, install the V4 driver from the official guide (a short copy-and-paste that also blacklists the conflicting kernel module), then reboot and run rtl_test again.
Install the decoder and a map
A single command from the widely used wiedehopf scripts installs the readsb decoder along with the tar1090 web map:
sudo bash -c "$(wget -O - https://github.com/wiedehopf/adsb-scripts/raw/master/readsb-install.sh)"Set your location
The decoder needs your antenna's exact coordinates to place aircraft and draw a range ring. The installer does not ask, so set them yourself, replacing the example with your own latitude and longitude:
sudo readsb-set-location 50.12344 10.23429Add the performance graphs
This optional add-on tracks message rate, range, and signal level over time, which makes tuning and troubleshooting far easier:
sudo bash -c "$(curl -L -o - https://github.com/wiedehopf/graphs1090/raw/master/install.sh)"Open your map
Browse to http://adsb.local/tar1090 for the live map and /graphs1090 for the graphs, using your own hostname or the Pi's IP address. Within minutes you should see aircraft, assuming any are in range.
RTL dongles run hot, and a warm dongle drifts. A short USB extension cable moves that heat off the Pi and, just as important, keeps the dongle away from the Pi's USB 3 ports, which spray interference right in the 1090 MHz band.
Tune the gain
Everything from here on is the optional, command-line half of the project. If you took Path A, you already have a working radar and can stop any time; these sections refine and extend a from-scratch build.
Gain is the setting that most affects how much you hear. Too high, and strong nearby signals overload the receiver, so it decodes fewer and more garbled messages. Too low, and you miss faint, distant aircraft.
Modern readsb tunes itself. Set it to automatic gain once and it keeps adapting on its own:
sudo readsb-gain autoAuto-gain settles over hours, not minutes, as it gathers message statistics, so do not judge it on the first afternoon. If you are in a strong-signal area and overload is your problem, or you care more about close, low-flying traffic than maximum range, set a fixed lower gain instead and compare your message rate on the graphs page.
Mount the antenna for range
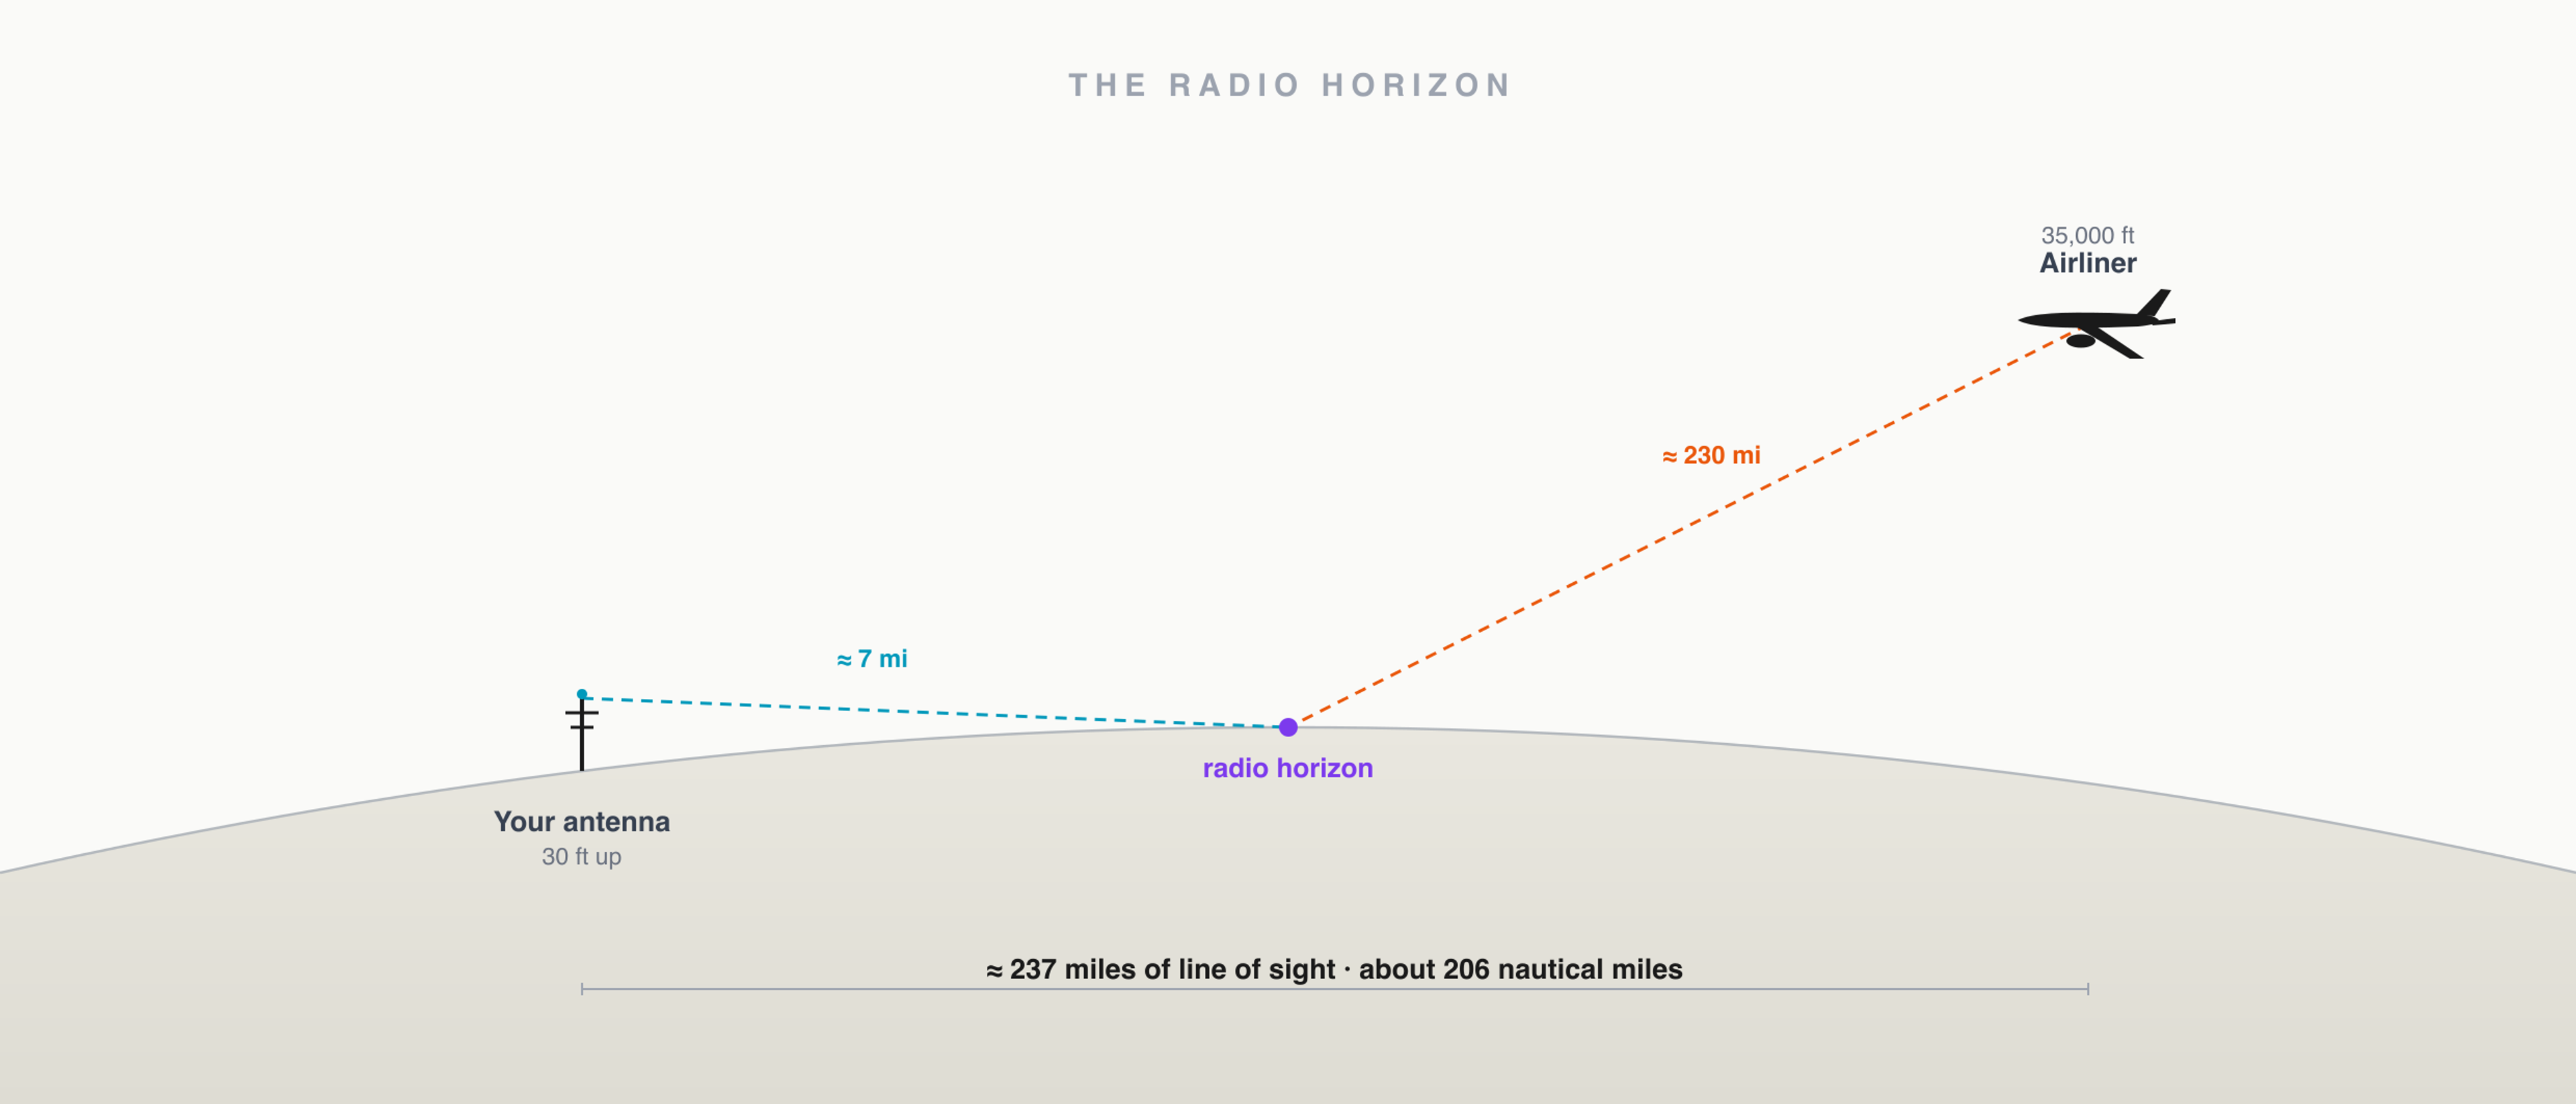
Of everything in the build, where you put the antenna matters most. ADS-B at 1090 MHz travels by line of sight, so the receiver can only hear aircraft above its local horizon. Raising the antenna and giving it a clear view of the sky does more for range than any amplifier.
That sets your expectations. A window antenna might reach a few dozen miles; a clear rooftop mount, free of obstructions, can hear aircraft more than 200 miles out; one reviewer measured 232 nautical miles, about 270 statute miles, from a second-story window. High-altitude airliners clear your horizon sooner, so you see them much farther than low traffic.
Coax loses signal over distance at 1090 MHz, and thin cable loses it fast: RG-58 is fine only for a short jumper, not a real run. For any length, use genuine low-loss coax such as LMR-240, or LMR-400 for a long rooftop drop. If the run has to be long, an antenna-mounted filtered amplifier (an LNA) set before the cable beats fighting the loss. And if you live near cell towers or strong FM transmitters, a 1090 MHz filter keeps those out-of-band signals from desensitizing the receiver.
That is the short version. Antenna height, line of sight, coax, and filtering each repay real attention, and how to extend your ADS-B range is the full playbook once your receiver is running.
Feed the networks
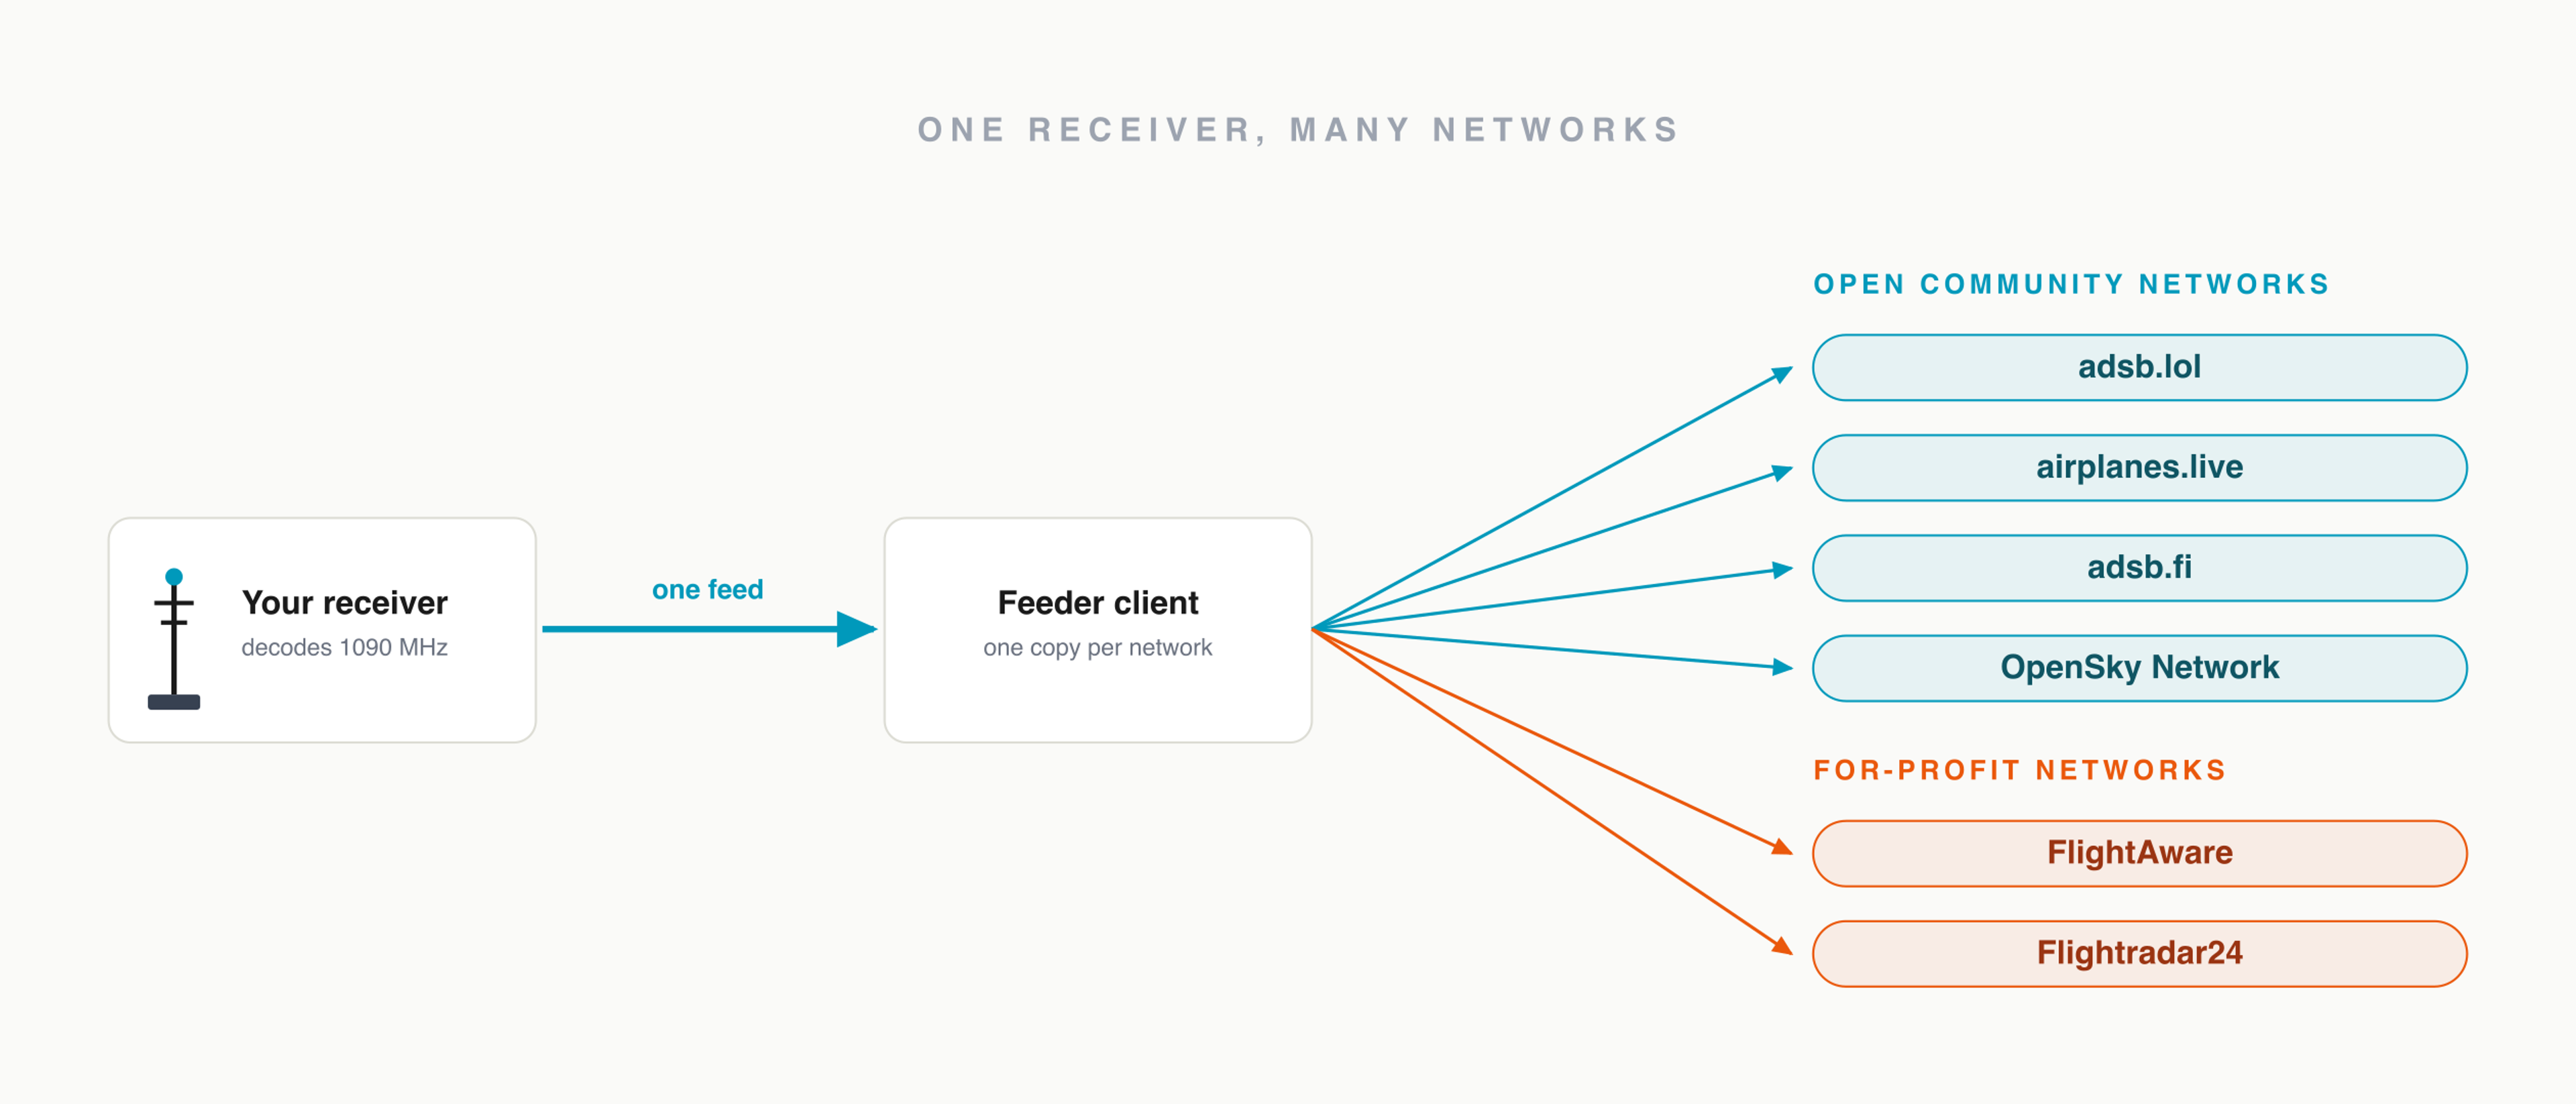
The public flight-tracking services are built from thousands of receivers exactly like yours. Pointing your feed at them turns your few hundred miles of coverage into one tile of a map that spans continents. Your decoder keeps running locally either way, and the feed clients are built to run alongside each other, so you can send to several at once.
It is worth choosing where that data goes. The networks below are community-run and publish their aggregated data openly rather than reselling it. They exist for a reason: ADS-B Exchange, for years the unfiltered community aggregator, was acquired by the for-profit firm JETNET in January 2023, and many of its volunteer feeders started open replacements, adsb.lol, airplanes.live, and adsb.fi, rather than feed a commercial owner.
Each open network installs with a short script that detects your decoder and starts feeding:
curl -L -o /tmp/lol-feed.sh https://adsb.lol/feed.sh
sudo bash /tmp/lol-feed.sh
airplanes.live and adsb.fi work the same way, each with its own installer:
curl -L -o /tmp/feed.sh https://raw.githubusercontent.com/airplanes-live/feed/main/install.sh
sudo bash /tmp/feed.sh
There is also the OpenSky Network, a non-profit run for academic research, which welcomes feeders and provides open data access in return.
You can also feed the commercial services, and most reward contributors. FlightAware gives feeders a free Enterprise account, and Flightradar24 gives a free Contributor plan. Feeding several networks at once is normal and does not hurt your local map.
Feeding one network is the short version. Choosing among them, the no-terminal feeder image, and confirming your data is landing get the full treatment in how to feed the open ADS-B networks.
Optional: add 978 MHz in the US
This is the upgrade for US light-aircraft watchers. Some smaller general-aviation aircraft below 18,000 feet broadcast on 978 MHz UAT rather than 1090, and that link also carries a free uplink of weather and aeronautical notices. A second RTL-SDR running the dump978 decoder picks it up, adding the low, slow traffic a 1090 build alone misses. The wiedehopf scripts install dump978 the same way as readsb, and it feeds alongside your 1090 setup.
With two dongles, the software has to tell them apart. Use rtl_eeprom to set a distinct serial on each, for example 00001090 and 00000978, then point each decoder at its dongle by serial. Without this the two decoders fight over the same device.
Verify it works, and fix it when it does not
Once it is running, the local map should show aircraft within minutes if any are overhead. The graphs page shows your message rate and how far out you are hearing aircraft, which is the real measure of a healthy station. As you improve placement and gain, the range polygon grows to fill the map.
When a new build sees nothing or struggles, the cause is almost always one of these:
- No reception on a V4: the driver is not loaded. Run
rtl_test; if it cannot see the dongle, install the V4 driver. - Short range or garbled messages: gain is wrong for your area. Set auto-gain, or pin a manual value.
- Very little traffic: the antenna is indoors or blocked. Get it higher and give it a clear view.
- Random crashes or dropouts: the Pi is underpowered, especially with two dongles. Use the official supply and check for undervoltage with
vcgencmd get_throttled(anything other than0x0means power trouble). - Poor range in a city: strong nearby transmitters are overloading the receiver. Add a 1090 MHz filter.
What you end up with
What started as a dongle and an antenna is now a permanent, private window onto the airspace overhead, built from the same parts the global tracking networks run on. The planes you just watched appear on your screen were decoded from raw signal by a box on your windowsill, and those same broadcasts, gathered and rendered, are what become a SkyPath print. The data was never abstract; now you can hear it arrive.
Image credits
RTL-SDR dongle photo by Konstantin Kudinov, licensed CC BY-SA 4.0, via Wikimedia Commons.