You built a receiver, aircraft are showing up on your map, and now you want to see more of them, farther out. Range is the most rewarding thing to chase in this hobby, and most setups hear far less than they could. The biggest improvements cost nothing. This guide works through the levers in order of impact, from where you mount the antenna to the cable and filtering that carry the signal, and shows how to measure what each change buys. If you have not built a receiver yet, start with how to build an ADS-B receiver.
Most of what limits your range is free to fix. Work these in order, and stop once your coverage map looks the way you want:
- Get the antenna higher and clear of obstructions. Free, and almost always the biggest gain. Above the roofline with an open view beats anything you can buy. (No roof access? An attic or an upstairs window still beats a desk.)
- Read your range plot before spending. A clean, round plot means you are near your site's limit, and more hardware will not move it.
- Shorten and upgrade the coax if more than a meter or two of thin cable runs up to the antenna.
- Add a 1090 MHz filter if you are near a city. Often the biggest hardware gain in a noisy area, about $20.
- An amplifier or a better antenna last. The smallest gains per dollar, and the easiest to get wrong.
On a tight budget, the filter (if you are urban) and a length of LMR-240 are the two buys that move the needle; the rest can wait for a clean plot.
Range is line of sight, not power
Why does that order start with height? Because a 1090 MHz transmission behaves like light. It travels in a straight line to the horizon and carries on past it, out over the curve of the earth as the planet falls away beneath. What limits how far you hear an aircraft is not the strength of its transmitter. It is whether anything sits in the way of that straight line.
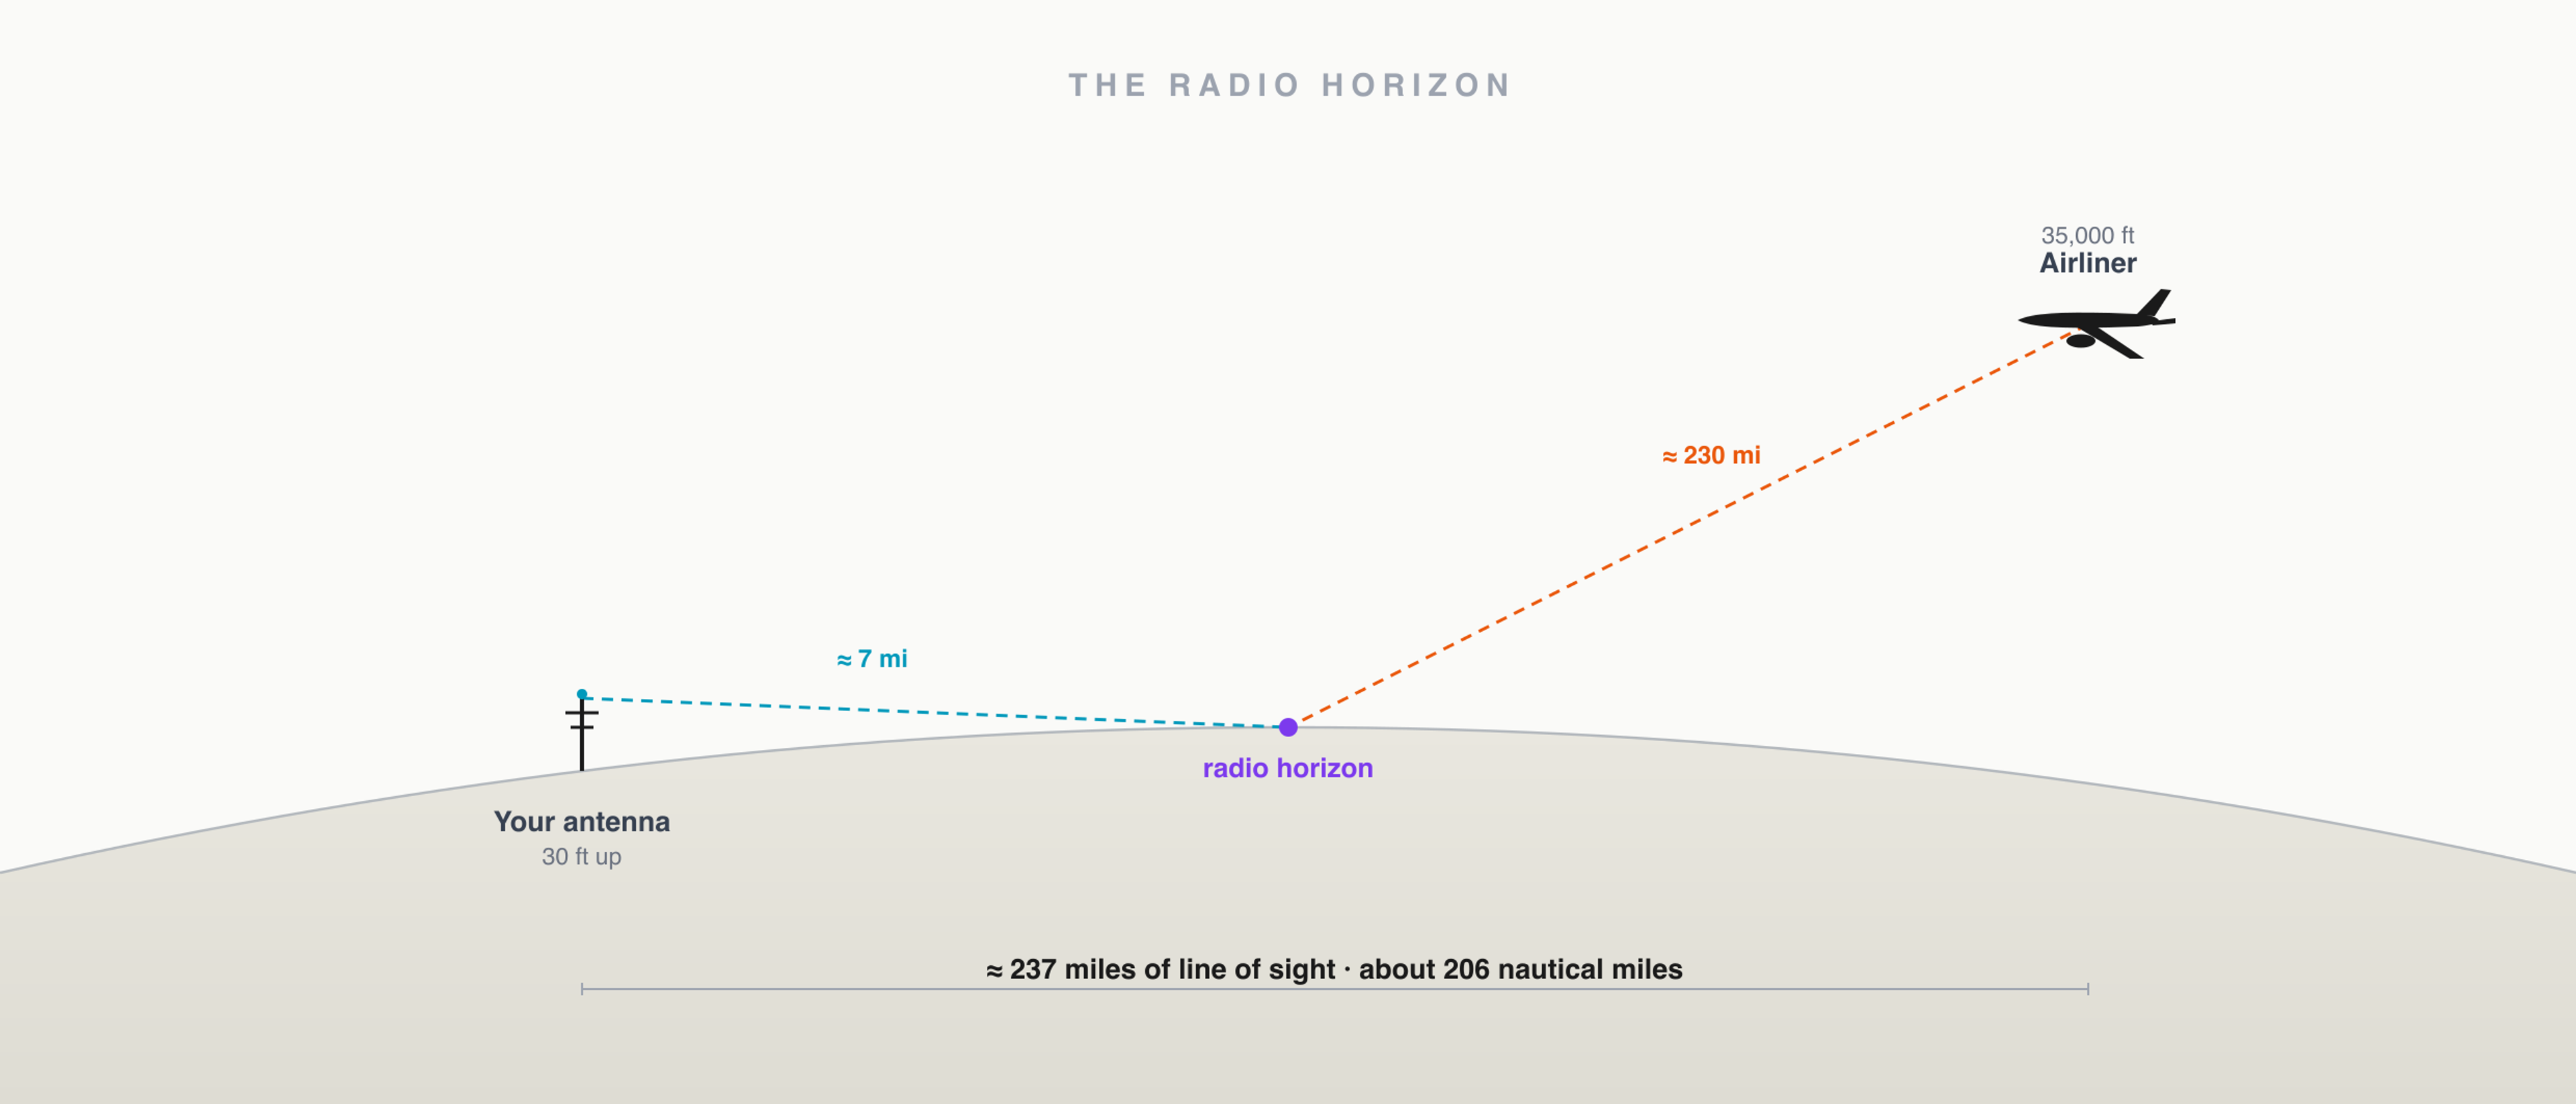
How far that line reaches comes down to height, and there is a simple rule for it: the distance to the horizon in miles is roughly 1.23 times the square root of the height in feet. The aircraft does almost all of the work. An airliner at 35,000 feet has a horizon of about 230 miles on its own, close to 200 nautical miles. Your antenna at 30 feet adds only about seven. Together, a rooftop receiver can in principle hear that airliner from around 237 miles out, a little over 200 nautical miles. Well-sited feeders routinely report 200 to 250 nautical miles, and the best sites, hearing aircraft even higher up, push past 300 (rtl-sdr.com collects the range records).
Notice how little your own height adds: about seven miles out of 237. So why does antenna height matter so much? Because the geometric horizon is rarely what actually caps you. A distant aircraft sits low in your sky, just above the horizon, which is exactly where your roofline, your neighbor's trees, and the hill down the street block it. Raising the antenna does not extend the horizon so much as it clears the clutter between you and it.
Get the antenna high and in the clear
Two things drive placement: height, and a clear view of the sky.
Height first. Above the roofline beats the attic, which beats a windowsill, which beats a desk. Every obstruction you rise above opens a new slice of distant, low-on-the-horizon sky. A few feet of mast on a one-story roof can be the difference between 80 nautical miles and 200.
Then a clear view. Trees, buildings, and terrain block low-elevation signals in the direction they sit, and distant aircraft are always at low elevation. The effect is directional: a tall building to your west dents your coverage to the west while leaving the east untouched. A clear view in every direction is ideal, but few of us have one, so point the antenna's best exposure at the sky you most want to hear. Keep it vertical, since ADS-B is vertically polarized, and away from large metal surfaces that reflect and block the signal.
Mounting an antenna outdoors means working at height and adding metal to your roofline. Use proper fall protection, keep well clear of power lines, and ground an outdoor mast against lightning. If that is out of your comfort zone, an antenna in an attic or at an upstairs window still beats one at a desk.
Use low-loss coax, and keep it short
With the antenna up high, the cable bringing the signal back down becomes the next bottleneck, and at 1090 MHz cable loss is brutal. Thin RG-58 throws away around 0.6 dB of signal per meter, which is fine for a short jumper and ruinous over a run to the roof. Step up to LMR-240 for a typical run, where the loss roughly halves to about 0.3 dB per meter, or LMR-400 for a long one, at about 0.2. Every decibel the coax eats is a decibel of range gone (3 dB is roughly half your signal), and unlike antenna placement, you cannot win it back later in software.
| RG-58 | LMR-400 | |
|---|---|---|
| Loss at 1090 MHz | ~0.6 dB per meter | ~0.2 dB per meter |
| Best use | Short jumper, under a meter | The full run to a rooftop antenna |
| Build | Thin and flexible | Thick and stiff |
| Cost | Cheap | More, and worth it on a long run |
Water in a coax line is a common and especially frustrating range killer, because it creeps in slowly and you watch performance decline for no obvious reason. Wrap outdoor connectors in self-amalgamating tape and leave the cable a drip loop so water runs off rather than into the connector.
Add a filter, and maybe an amplifier
If you live anywhere near a city, the air around your antenna is thick with strong signals that have nothing to do with aircraft: cellular towers, FM broadcast, paging transmitters. None of them appear on your map, but they swamp the receiver's front end and leave it deaf to the faint 1090 MHz pulses you actually want. A 1090 MHz bandpass filter (FlightAware's, or the RTL-SDR Blog equivalent) rejects everything outside the band, so the receiver stops fighting signals it was never meant to hear. The FlightAware Pro Stick Plus has one built in, which is part of why it is a sound first dongle in the build guide.
A low-noise amplifier, or LNA (the RTL-SDR Blog and Uputronics units are popular), mounted up at the antenna is the other half. It lifts the weak signal before the coax has a chance to lose it, so it helps most on long cable runs and marginal setups. Order matters: put the filter and amplifier at the antenna end, ahead of the coax run, and use a single filtered LNA rather than stacking several. Too much gain overloads the receiver just as badly as interference does.
| Component | Notes | Approx. price |
|---|---|---|
| 1090 MHz bandpass filter | The biggest fix in noisy / urban areas | ~$20 |
| Filtered LNA (amplifier) | Mount at the antenna; recovers long-run coax loss | ~$30 |
| LMR-240 coax (with connectors) | Low-loss feedline for a typical run | ~$30 |
| FlightAware 1090 MHz antenna | A purpose-built antenna beats any stock whip | ~$50 |
| N-to-SMA adapter or pigtail | Joins an N-type antenna to the SMA dongle | ~$8 |
Upgrade the stock antenna
The little telescopic whip bundled with a dongle is built for convenience, not range. A purpose-built 1090 MHz antenna, a quarter-wave ground plane or a collinear, is cut to the band and clearly outperforms it. The FlightAware 1090 MHz antenna is the common store-bought choice, though budget for the whole path: it ends in an N connector, so the real upgrade is the antenna plus an N-to-SMA adapter and a length of good coax, closer to $80 than $50. A collinear concentrates its sensitivity toward the horizon, which is exactly where distant aircraft sit, so it suits range chasing well.
There is one tradeoff worth knowing. The highest-gain antennas squeeze their pattern into a thin band at the horizon, which buys distance but can leave you slightly deaf to traffic passing directly overhead. For most setups a moderate-gain collinear, mounted high, is the sweet spot.
Building your own is a genuinely good option. A coax collinear costs a few dollars in parts and rivals commercial antennas, though it is involved enough to be its own project. For now, a store-bought antenna up high on good coax will take most setups as far as they need to go.
Tune the receiver's RF gain
One software lever sits alongside all this hardware: the receiver's RF gain, which is separate from antenna gain. Set it too high and strong nearby aircraft overload the front end and bury the faint distant ones you are reaching for. Set it too low and you miss weak signals entirely. The right setting is the one that maximizes how many messages you decode. The simplest path is the decoder's automatic gain mode, which most feeders leave switched on; the build guide covers turning it on and tuning by hand.
Measure what each change buys you
Resist the urge to change three things at once. Adjust one lever, then let the receiver run for a day or two and read the results in graphs1090, the statistics add-on from the build guide. It opens at your receiver's web address, under a graphs1090 link near your live map. Two plots tell you most of what you need. The message rate shows whether you are decoding more overall, and the polar range plot shows how far you are hearing in each compass direction.
That range plot is the real prize, because its shape is a map of your obstructions. A clean circle means an open horizon. A bite taken out of one side points straight at the tree or building blocking that direction, which tells you exactly where the next free improvement is: get above it, or move the antenna a few feet to see around it.
Treat the polar range plot as a to-do list. The directions where your range falls short are almost never about hardware; they are about something physical in the way. Each dent is a specific obstruction you can sometimes clear with a foot of mast or a better mounting spot. Hardware works differently: a filter, better coax, or an amplifier lifts the whole plot evenly, so it is the fix for a generally weak setup, not for a single blocked direction.
Where the range goes
A well-placed receiver with a clear horizon hears two hundred nautical miles in every open direction, which works out to thousands of aircraft over a single day. That steady stream of positions is the same raw material behind the flight-path prints we make at SkyPath, and watching your own coverage grow is a good way to understand what is in the data before it ever becomes art. If you are still new to the signal itself, what ADS-B is and the problem it solves is the place to start.